- Click the Save button.
- Use the drop-down to find your name/space on the server.
-
Click the little folder icon
 to create a folder called <yourfirstnameweb>. (Example:
jordanweb)
to create a folder called <yourfirstnameweb>. (Example:
jordanweb)
- Double click on it.
-
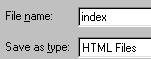
Name the file index
and click save.
| Key Word or Phrase for Link | filenameforlink | Title of Page |
| paintball gun | gun | All About Paintball Guns |
| night vision goggles | goggles | Night Vision Goggles |
| camouflage | camo | All about Camouflage |
| equipment | equipment | Equipment You Need |
| try it yourself | try | How to Get Started |
